Friday, March 23, 2012

Picture Frame Dry Erase Board


My dad turned 60 today!  We had a great time, the two of us, going down to DC to see the Cherry Blossoms, and then grabbed sushi which I never get to get because my mom hates it.  So some good does come from my brother's wild tour of Florida!  We had a great time, and I have pictures of our trip at the end of the post.

On to the craft.  I made a dry erase board out of a picture frame.


After we got back, Dad took a nap and I did another craft (this week has been quite packed!)  I've had this picture frame for quite some time, and since I began redecorating my room it has been hanging up with nothing but the price tag showing.  Yesterday when I went to Michaels I bought some scrapbook paper (7 sheets for $1), one of which I thought would look cute in my room for this craft.  I have also decided that at some point in the future I will be repainting the frame from silver to a distressed white, but I was too excited with my success to wait until then to post it.

Materials:
  • picture frame
  • fancy shmancy paper
  • embellishments
  • scissors


I love the pink color of this paper.  It was so cheap because it had some bends in it, but I figured I'm only using a little bit of it, so I could avoid the damaged bits.  Especially for 14 cents.


The picture frame was 50 cents at a thrift store.  I bought this a couple of years ago, and it's been stuffed away in my room.  Finally put it to use!


First thing I did was trace and cut out a piece of paper the size of my picture frame.  I used the backing of the frame as a guide.


Ta-da!  Perfect fit.


This had been my original plan, but something was missing.  I have a tendency of going overboard, but this was just not enough.  Therefore, I appealed to my latest obsession...


Birds and birdcages!  I desperately want a birdcage necklace, and have an idea so that should be coming soon.  I looked around for ideas, and came up with these two ways to embellish my dry erase board.  You could also use stickers, rub-ons, sequins, the sky's the limit!  And you may have some leeway.


After printing and cutting out my shapes, I taped them to carbon paper and positioned it over my scrapbook paper.  Carbon paper is fantastic, and my mom uses it all the time in her crafts.  My original plan was to copy down my shapes, then paint over them in a cream color.  That didn't end up happening (spoilers!)


After checking out my birdcage, I decided I liked the sketch look that the carbon paper made.  I figure that if I get tired of it, I can always paint over it.  I'm in no rush.


The finished paper.  I.  Love.  It.  I don't know what that dark shadow is in the middle of the paper- my camera's been having issues, and I think it picked out a ghost.


 I'm a fan of how it turned out.  If you knew me, you'd know I live by dry erase.  I have two dry erase boards in my room in my apartment that I use constantly.  One of them is right by my bed, so that I can jot things down as they come to me while I'm falling asleep.  It's a great way to relax your mind when you start worrying about things you need to do.  If you write them down, you know you won't forget them in the morning!

Some ideas for your own dry erase board:

  • Keep one in your kitchen to write down your weekly menu or grocery list
  • Keep one for each family member so you can write notes to them.  Let everyone design their own, too, so that they're personalized!  That'll also get kids to check them more.
  • All about decorating for the seasons?  This is perfect!  Scrapbook paper is generally less than a dollar, so it's easy to change for each holiday.
  • Keep by the phone for a quick and colorful way to jot down phone messages.  Who could resist taking down information on such a cute board?
  • Nervous about using glass?  Go ahead and laminate it instead!  Laminated paper works just as well, and you don't have to worry quite so much about it dropping and shattering ;)
Any other ideas?  Please post them in the comments, or pictures of your own creation!


Finally, I thought I'd post some pictures of the cherry blossoms in DC.  When I was in high school my mom would takes us out of school (a 'personal day') for a day to go down to DC and check out the blooms.  It was always a huge production that we all looked forward to.  Since college I've gone down once with friends on the weekend of the actual festival, until last year when they charged to check out the activities going on.  It gets so crowded at the tidal basin, but it's fun to people watch.  So many folks come out to take fancy pictures during that time for weddings, and everyone is dressed up in their best spring attire for family photos.  I adore being so close to DC!


 The blooms came early this year due to the warmer weather.  By the time we got down, some of the trees were already half green.  They were still pretty, though, and I loved the constant snow of petals.


While down there we took a look at the Martin Luther King Jr. memorial, which I hadn't had the opportunity to check out yet.  I was impressed- they picked some fantastic quotes for around the memorial.


"I have the audacity to believe that peoples everywhere can have three meals
 a day for their bodies, education and culture for their minds, and dignity,
equality, and freedom for their spirits."


"Darkness cannot drive out darkness, only light can do that.
Hate cannot drive out hate, only love can do that."


We also swung by my favorite memorial, the Theodore Roosevelt memorial.  I can just imagine spending a day there by one of the water features, reading a book and enjoying the people.

"The structure of world peace cannot be the work of
one man or one party or one nation.  It must be a peace
which rests on the cooperative effort of the whole world."


"The test of our progress is not whether we add more to the
abundance of those who have much.  It is whether we promise
enough for those who have too little."


I'm amazed by how so many of these ideas still ring true today.


"Men and nature must work hand in hand.  The throwing out of balance of
nature throws out of balance also the lives of men.


This is my favorite view by the tidal basin.  We have countless pictures from over the years of just this view, but every year I can't help but grab another shot.

I hope you enjoyed this craft and my pictures.  The dry erase board is a craft that will never look the same for two different people.  I would love to see what you come up with!


Thursday, March 22, 2012

Nautical Necklace

Anchors aweigh! 

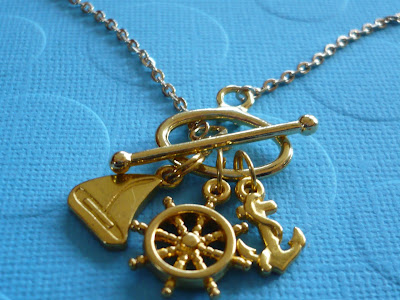
Spring Break is coming to a close, and I realize that I've done no homework, and more crafts than I should have been able to responsibly do.  I don't know how I got time to do them, however, between the constant shopping trips!  Today I drifted between craft stores, and when I got home continued the party online.  I've officially ordered a charm that I've been searching for for weeks, and as soon as it arrives I have an awesome craft I'll be posting.  Today, however, I got the bounty for a necklace:

The set of charms was $2 at Michaels.  Of course I printed out a coupon for 20% your purchase including sale items, and completely forgot about it.  Oops, I guess I wouldn't have saved that much anyways.  It's just the concept.  The clasp and chain were 50% off at Hobby Lobby, so the grand total for the necklace was about $4.  Not too shabby!


Spring clasps are great, but sometimes you just want something a little different.
Toggle clasp, ftw! 

I replaced the spring clasp with a toggle clasp.  You'd be amazed at how long it took me to pick this one.  I couldn't decide if the gold of the chain/toggle matched, and polled quite a few women at the store.  I also came to the realize that only older women shop at 1pm on a Thursday at Hobby Lobby, and that these are not the women to ask about color matching.  No offense.


Save this for later...  You never know!


(Again, I'm pretty sure all crafters are hoarders)


Then I attached the charms to the toggle clasp.  This was excessively difficult.  Instead of having normal jump rings the charms were on these sort of key chain things that did not want to open wide enough to be put on the toggle hoop.  Honestly, I'm posting this about 5 hours after making it, and my thumb nails still hurt.


But it's so pretty!  I love how my pictures turned out!  They had some paper on serious sale at Michaels (7 for $1) and I have some crafts coming up that require paper.  While this was chilling in my craft area I decided to put it to work.


And speaking of Michael's clearance.  I adore Michaels- I go there a couple of times a month, and twice this week.  But their clearance?  Seriously.  50 cents off does not a clearance item make.  And it was even worse today than usual.  I was sifting through the beads in the clearance, and noticed some were there for $9.99.  First off, I don't consider it clearance unless it's less than $3.00.  Secondly, the original price?  Guess.

I'll give you a minute.

Yup.  $9.99.

And that wasn't just one item.  Over half of the strings of beads I picked up were not actually at all on clearance.  When I went to check out, I told the cashier about it (yeah, I'm one of those) as well as asked for a price check on another item.  This charm was missing the inset it had originally had, so I assumed it would be on some sort of sale.  Especially since I found it in the clearance section.  Nope.  Still was $4.99. She was very helpful and said that she would check out the clearance and fix it, although I'm sure that was to pacify me.  But she humored me, which I guess is half the battle of retail

By the way, this is the same problem I have with Marshalls/Ross/Home Goods.  When I look for a deal (and I'm always looking for a deal) I expect to be able to find something for less than $5.00.  Those deals are few and far between at those stores.  I'm a thrift store chick born and raised, and I know I'm ruined for normal stores.

Now that I've gone through that rant, leave a comment if you think I'm completely unreasonable in my expectations,  or if you agree wholeheartedly,  or if you want to post 'first!'.  Am I sounding needy enough?

Til next time!


Tuesday, March 20, 2012

Monkey Fist Knot Earrings

 
Guys!  Guys!  I made earrings!

I love the monkey fist knot, and have been wanting to make a pair of earrings with them especially now that spring is officially here!  What better time to work on them while watching "New Girl"?  They were so easy to make, too!

I'm going to try to walk you through the monkey fist knot, but if you get annoyed with me you can go here for a pretty legit walk through.  Other than inserting a marble, his steps are pretty much identical to mine.


Take your piece of string and loop it over two fingers.


Wrap the string around your fingers three times.


Take the end of the string and stick it through the loops you've made, bringing it out the back.


This is what it looks like when you bring the string through to the back.


Wrap around your first loops three more times, so you have a sort of cross going on.

Notice that the string you've just wrapped divides your first wrapping in half- a top half and a bottom half.  Keep that in mind for the next step.


Here's the tricky part of this project.  Bring the string through the top half of your loop, and loop it through the bottom half.  Do this three times, just like you did for the other loops.


And this is what you have when you're all done.  Wait, what?  This doesn't look a thing like that knot!  Don't worry- I've got you covered.  Now you'll need to gather all of your patience, and tighten up the loops so that they'll get into that nice, circular, monkey paw shape.


Tightening...


Tightening...  Takes a lot of maneuvering, but keep with it!  Don't give up!


And here we go!  This looks a lot better.  At this point I almost stopped and made a necklace, but I decided to not allow my laziness prevail.


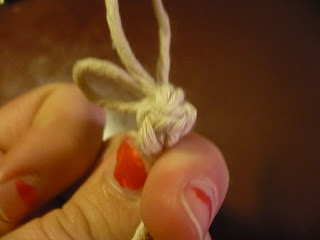
Take one of your loose strings, and pull tight.  Like, super tight.  Snip off the string as close to the knot as you can, as shown here.


Then, loosen the strings a little bit until the end you clip is inside of your knot.  Be careful not to work with it too much, just enough to make the end disappear.


Repeat.


And you have a monkey fist knot!


Grab a jump ring and your favorite earring hook.  Push the jump ring through one of your loops, and attach the earring hook.  After this, I applied some fabric glue to keep everything in place.  I'm not sure how well these hold up, but I figure the fabric glue will help keep it all in place.


Repeat these steps for your second earring, and you're all set and ready for the beach!  Is it summer yet?


I wish I could figure out how to take a clear close-up picture. But this shows you about the size.  Perfect for a pair of accent  earrings!


Whew!  Two posts in one night!  Although so far I have no views on my last one...  I have a great craft planned for this coming weekend, although I feel like I might not be able to resist doing it sooner.  Make sure you check back!


**Update- I wore these all day today, including about an hour long 60mph drive with the window down, and they held up perfectly.  No longer worried about their lasting power!**