Friday, April 13, 2012

Lined Paper Shirt

Sometimes crafts just don't happen the way you want.  But you've taken photos, and it's going up on your blog anyways.  Or my blog.  I loved the idea of this shirt, but I should have known from the beginning that it wouldn't be quite the best looking thing on me.


It is really cute, though.  And maybe if I lost 10 lbs it would look better on me.  So it's going into the back of my closet until said time!  Also, you can tell my fabric marker began running out (ok, ran out) by the end.


First I put magazine in the shirt so that the fabric marker wouldn't bleed through.

Use tape to mark the area to paint.

I used a red fabric marker to make the line that runs down the shirt.

Then I removed the tape.  It's a sketch-looking line, but I thought that added to the charm.

Then I used tape to mark the blue lines, and because I'm impatient I took off the tape as I went.

Meanwhile, Nicole sent Prudence to bother me.  Annoying hamster... If she wasn't so cute she'd be in big trouble!

Here it is, all the tape removed.  I can't believe my markers ran out...  But I think it looks just as cool.


It turned out cute, just not cute on me.  Either I'll let it chill in the back of my closet for a while, or I'll try to make it into a reusable bag.  We'll see!


Saturday, April 7, 2012

"Rock, Paper, Scissors!" Necklace

I'm home for Easter, so I'm afraid I'll just have to show you something I made without directions.  I think, though, that you don't really need any for this.


Aw!  It's my "Rock, Paper, Scissors!" necklace!  Finding that scissor charm was just about the hardest thing I've ever done.  I visited dozens of craft stores, called dozens of hobby shops, and no matter what I couldn't find one.  The thing that bothered me most throughout this escapade was that I know I had seen one before at Forever 21, but because I go to school in the boondocks I wouldn't be able to find it until I went home to visit.  In the meantime, scissor charms in Amazon and other online places taunted me, but I could not justify spending twice the amount of the charm on shipping and handling alone.

So for spring break I went to Forever 21 and found a gold scissor charm.  I'm not a gold person, but it was getting to the point that I just couldn't wait any longer to find the perfect charm.  Plus the necklace was only $1.50.  Forever 21 is a dangerous place to shop for jewelry...

As soon as I get home from finding this charm, I just happen to go to JoAnn's website.  And guess what?  Free shipping on online purchases.  So what's a girl to do?  I ended up buying the silver scissor charm as well.  But I like this one better not only because it's silver but also because it's smaller.

More beauty shots!  I love being able to use the yard at home to take pictures, as well as my mom's camera.    Mine is acting up, so I think it's about time to get a new one.  If only I could afford one!


I've worn this a couple times, and have gotten a few compliments.  I like that it's rather subtle, especially when I have it on a very long chain.

For those of you wanting to recreate this...
- Paper Bead:
   I made the paper bead a while back when I made my Paper Bead Necklace.  Follow the directions there to make your own!  I experimented with sizes on this necklace, and decided that I preferred a small one.  To make it into a charm, I used a headpin, threading on a white seed bead, paper bead, and another seed bead. I simply twisted around the top and put it on a jump ring.

-Rock Bead:
   I used another headpin for this one, again using a seed bead, rock bead, and another seed bead.  Twist over the top and put on the jump ring.

-Scissor Charm:
    At first I simply put one of the handles of the scissors through the jump ring, but I didn't like how that looked.  Instead, I put a jump ring through one of the handles and then put that jump ring on the jump ring along with the other charms.

Easy as rock, paper, scissors!  I know that I'm going to end up wearing this necklace out pretty quickly- I'm completely in love!

Anyways, I'm off to have Easter Eve brunch, and then we're heading off to see the Orioles beat the Twins!  The perfect Easter Eve...


Any other ideas for cute themed necklaces?  Leave them in the comments!

Tuesday, April 3, 2012

Magnetic Glass Whale

Internet's working again!

I know, took long enough.  You'd think that the exorbitant amount I'm paying to live here would mead adequate internet, but no.  Finally, though, it's up and actually letting me load pictures, so maybe I now can get on with my life.

Which includes... I just got back my Praxis II score for Elem. Ed. Content Knowledge! I got a 191, which is in the top 15 percentile.  Can I just tell you I'm a little stoked?  I am just that much closer to my teaching certificate.  Now to get myself on task and actually fill in those job applications...

To show you how responsible I am, here's the craft I did this weekend instead of homework!

Awww!  So cute!


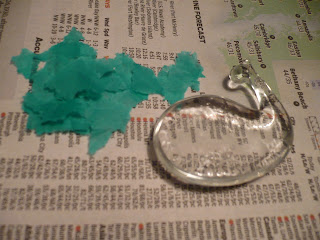
It's a little magnetic whale!  The perks of having a roommate taking glass blowing is you get sweet little chatskies that you can mess with.


So here's the shape Nicole gave me.  She was so excited that she accidentally made a whale, and I was so excited that she gave it to me!


I decided that it was about time for me to play with my tissue paper.  I picked through my stash and found this pretty teal-ish color.  I thought it looked very appropriate for a whale.

I tore the paper into little bits.  When Mod Podging it, I placed them down one by one on the glass.  It's much less frustrating if they're pre-torn.
Layer that glass piece with Mod Podge.

And place down your tissue paper.  This will be the back of your magnet.  I was sure to rub them down as I went, and I applied another layer of Mod Podge when I was done.


Then I decided that I wanted some more colors.  I grabbed a dark blue piece of tissue paper and repeated the above steps with the new color.


This is the back of the final product....


And this is the front!  I'm so glad I added that second layer of color.  It really makes the ocean feel I was going for.  Nicole said I should add eyes, but I like it as it is.  I tend to add too much detail.


After that, all you have to do is glue on the magnet.  I used an extra strong one (this is one magnet which could cause issues if it dropped off the fridge) and used a cold glue gun.  I would recommend using something like gorilla glue instead just because it would be easier.


And here's the final product!  Among Nicole's psychology word magnets...


By my freakishly cute birds I bought at Michael's...


And on our dry erase board on the fridge in the kitchen!  Gosh, he travels!

I'm lucky to have a roommate who brings me her mess-ups from class.  If you're not lucky like me, you can use the same idea to decorate glass plates, the bottom of glass cups, even the back of those little flat sided glass marbles!  If I was doing something like that, however, I would try to find a spray sealant made for glass.  The tissue paper on the back of my whale would easily peal off if I messed with it, which made it easy to clean up the edges but would mean death if it was something that was frequently messed with.

I'd love to hear any other ideas you might have, especially as Nicole keeps sending home more bits of glass shapes for me to use.  How else can I decorate them?  Please share in the comments!